Showing posts with label Robotics. Show all posts

Saturday, September 8, 2012

Dragon Con: Prep, Ready, and Deploy

Every year, my friends and I bring a plethora of robots to compete at Dragon Con's Robot Battles competition. It includes 1 and 3 pound robots for their Microbattles segment on Sunday, and 12 and 30 pound sumo robots for their main event on Monday.

As tradition, out entries must consist of several "assbots" among our serious entries.

Wheel! (Colson Bot)
After four years of being relatively invincible, I have decided to force-retire DDT. Replacing it at Dragon Con will be the beloved assbot dubbed "Colson Bot".

In the mid-2000's, the arena hazard for micro battles was a colson wheel attached to the output of an angle grinder. It was well known for its overpowering hits that often determined the outcome of the matches. Colson Bot was designed to look and function very similarly... without the stability of being bolted to the ground.

Being an assbot, I had determined that the budget would be minimal. Luckily I had just disassembled DDT and Prop Quiz which left me with several options for controllers and motors. I elected to recycle the gearmotors from Prop Quiz and the electronics from DDT.

There were two main steps to the design: finding a colson that could be bored large enough to fit the electronics and making a chassis small enough to fit in that bore. Given I had already selected my parts, I decided to reverse order design and build the chassis first.


Treads would have been ideal to maximize traction, but could not be done with the space constraint. Instead, the design used is pictured above. The robot is designed in layers. The bottom layer (including the wedge) is 3D printed out of PLA on one of the Invention Studio Ultimakers. The top section is waterjetted polycarbonate screwed on from the bottom of the robot. This top section mounts the Esskay 400xt brushless motor that directly drives the colson wheel (not pictured). I fully expect the 3D printed chassis to snap somewhere.

Colson Bot went together very quickly. I had only 8 holes to countersink and a few things to wire.


...and functionality tests.


Quick enough certainly. I'm dissatisfied with the acceleration of the robot, but once again I play the "apathy via assbot" rule. I have also yet to achieve maximum speed. the robot lifts off and goes unstable before I can spin it high enough. Although the esc braking function provides an interesting way to escape bad situations.


After a quick paint job, lets call it complete.

Dominant Mode
Clash of the Bots 3 showed me a few aspects of the robot that were not ideal:
  • The unreliability of Spektrum technology
  • The ineffectiveness of UHMW anti-wedge slips
  • Something resulting in periodic signal loss
  • Custom brushless drum subject to axial shifts
For now, we will waive off the Spektrum issue since it seem to have corrected itself somehow. The anti-wedge slips will be replaced by a few alternatives. 


I drew up this design awhile back. It uses a set of Titanium forks to get under opponents. I favorite this design because it leaves nice sharp points to get under wedges and are not dependent on the position of the other wedge tips. This is a good feature to have in case part of the wedge incurs damage; the other fine points will not be affected.

Others have recommended that I simply bend some blue-tempered spring steel. Since one option was clearly easier than other other, I decide to try waterjet machining some of the 0.01" spring steel stock I had bought for Razor Reloaded.

To prevent the drum shifting, I laser cut a thin ring of acrylic. This will keep the outer bearing from shifting off the mount. For Robot Battles, this should be fine as long as I don't fight and horizontal spinners. For future competitions, I will probably upgrade to a more ductile material like polycarbonate or polyethylene. 

In previous experience with Cake, my first explanations to the radio cutoff was a short between the ground and +5V lines somewhere in the receiver. For Cake, this would usually occur around the drum shaft, where the drum shaft ID would eat through the insulation and contact the PWM wires. For Dominant Mode, no such symptom was to be seen since all the electronics were contained within the body this time. I though perhaps the motor windings were shorting somewhere again, but drive independent tests confirmed otherwise. What ended up being the concluded culprit was the receiver. I had Adam Bercu of Busted Nut Robotics pick up a Spektrum AR6115e on his way down to Atlanta, which solved the problems.

Turboencabulator
What in the world is a turboencabulator? Few people know, but it sounds pretty complicated even though the only new principle involved is power production from the modial interaction of magneto-reluctance and capacitive directance. 

It is a sub-ass bot designed to go fast. I want it to be good yet require minimal spending on my part so many of the parts will be recycled from random things. The basic idea was to create a sturdy 4-wheel drive base and incorporate some simple active weapon on it. 

I was originally intending on using some 860-sized Johnson motors on some 5:1 gearboxes I had, but I would only be able to use two of them and 4-wheel drive with chain would have become costly very quickly. Instead I opted for some low RPM (high kt) 540-sized motors from surplus center. These guys put out a whopping 62 oz-in/amp! Combined with the 5:1 gearboxes on 3" wheels, I could move 24lbs while only drawing 16 Amps continuous. Sounded like an ideal duty for my Banebots 12-45 ESCs that havent seen action since 2008.


The 5:1 gearboxes were salvaged from the Hitachi copier motors that we previously purchased for stator grabs. We had maybe 6-7 of them on hand and since they included bearings it was idea for a low cost solution. Pinions were made from the motor-side shafting by rough cutting them to length, facing them, and then boring them on the lathe. The arbor press finished the installation process.


The 30A Mcmaster bots wheels were pressed directly on the shaft of the output gears. This assembly was suspended in between two frame rails made of HDPE (for now). 


From there, the robot quickly went together.
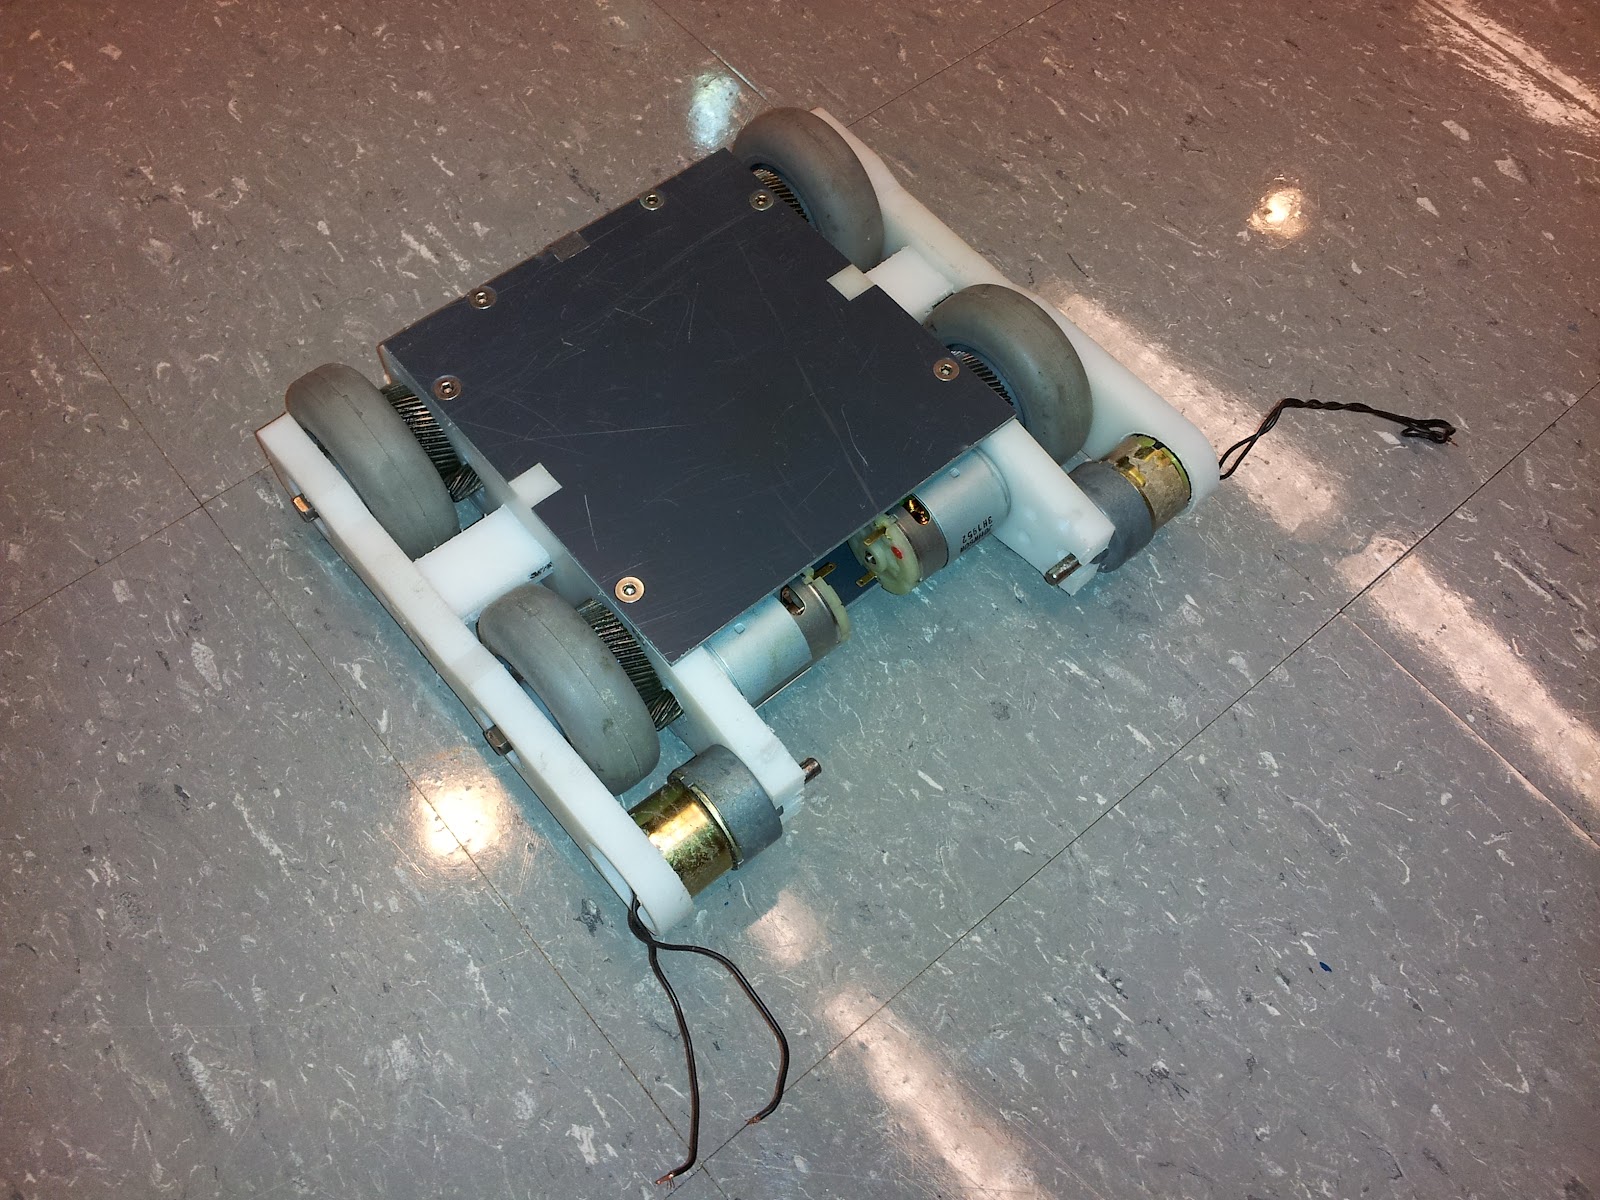
The Turboencabulator sans roller weapon.


However, did not fair well in some sparring.


The Carly Rae Jepsen Wallbanger puts a nice one into Turbo's side.


The hit actually smashed in a roller motor and deformed the HDPE enough to cause plastic deformation. So the robot was upgraded with steel outer panels thanks to Adam once again.

Intermisssion: Other happenings during the Dragon Con prop week.
Fun things to do with 30 pound combat robots:


The MIT crew bought over 14 power tools from Harbor Freight to hack into robot drives.

Greg bot (Critical Space Item). It has the drive train of a 12 pound robot.

Competition: Sunday
There wasn't much to say about Micro battles because the competition did not last long. It was originally a double elimination tournament but due to the record number of competitors and truncated time allotment for the ballroom, they decided to switch tournament types mid-way through.

Dominant had only one opponent before driving through the pit. Here is the footage.


Turns out the hotter wound motor is too fast. With the spring steel wedglets gripping the floor, I couldn't get enough ground speed to bite into the opponent. The first match shows robot milling while the second match shows more effective biting from 30% throttle.

The second match also shows why I should stop trying to push opponents into the pit. Fail.

Colson bot did not receive the same recognition as I had expected because the EO was rushing. Here is the result.


Without an e-clip on the motor, the top comes off and splays itself around the arena.

Competition: Monday
Arrived nice and early to talk jabber with the other builders.


Turbo was ready to go, fully charged and sporting its new A-36 side plates. It weighed 11.5 lbs.


Our friends from the north were already there with a beautiful array of 30 pound robots.


Dale Heatherington brought the competition's first fully autonomous robot, Scary-Go-Round. It is able to track the opponent and stage boundaries while constantly rotating. Quite an amazing robot.

Turbo had the first match of the competition against a solid block robot named Ice Cube.


The rollers worked perfectly! Between the higher RPM 2" colsons and the 3" mcmaster bot wheels for drive, I was able to "dribble" my opponent on top of my robot for the perfect delivery. Match 1-3 was a great display of control over the opponent.

Unfortunately, match 2 was not as lucky. I was pitted against a robot named Tilla the Hun, which used a very similar principle to turn over other bots.


He had wire brushes for wheels which gave him superior traction on the carpeted surface. I though perhaps my ramming mass alone could push him back but he had superior traction.

For the rest of the competition, I aided with Charles' and Adam's robots since they had some major repairs between matches. One of which resulted in Uberclocker Ubershanker.


That is my $15 katana strapped to the clamping arm of Uberclocker to try and compensate for its broken lifter spatula. It actually worked vs a match against Pinball, as it lodged perfectly in between the body and top plate.

Turbo's final appearance was in the 12 pound rumble where it once again showed its ability. Because Michael Jeffries of Near Chaos Robotics swept both events, I was gunning for him but Apollyon's quick drive train kept it a chase the entire time.


Conculsions
Overall, the competition was a personal fail considering my experience but it was a nice change of pace. I was able to experience the relaxing end of robot combat with the best seats in the house (backstage). I'll be thinking about new designs for future competitions. The next competition believe is the Atlanta Mini Maker Faire (October 6th) and Chattanooga Robot Battles.

I'm dreaming of a 12-pound Uberclocker...

Saturday, July 21, 2012

Clash of the Bots 3: Semi-Domination

A lot of time and project progress passed by. Mostly undocumented because of ME 2110: Creative Decisions and Design.


Nonetheless, Dominant Mode debuted at the COB3 event in North Carolina this past weekend on the 14th. It placed 4th but did not disappoint when it was in optimal shape. Let's recap the final preparations and continue to describe machine performance.

With a completed frame, it was time to push together the weapon. It was composed of four main parts: the drum, the motor can, the stator mount, and the outboard endcap. I had previously intended on having Whyachi machine my drum, but after telling me they couldn't make it or it would cost me $400, I decided to pursue alternate methods.

The drum design then simplified drastically. Instead of the unibody drum, the drum became an assembly of steel bars welded to a grooved tube. There were several competition teams and ME staff that could help me weld so I would save oodles. Plus, I could machine all the parts myself on the mill, lathe, and waterjet. Hardening could be achieved through begging to Braddock Metals in Atlanta, or utilizing a kiln we dug out of a dumpster by the physics building. It was a solid plan.

4130 was selected for the drum body, and 8630 (keyway stock) was selected for the teeth. Both are chromium-molybdenum steels that anneal, harden, and temper at the same temperatures (according to the ASM materials handbook). Plus they were cheap. About $20 for the drum so far.

Some hours of machining later, I had prepped the drums and teeth. Buying 1 ft of material from Online Metals was enough to two drums. No harm in spares right?


The drums were welded together by my friend Craig Wooden. Thanks Craig!

At this point I had put off drum construction that I needed to harden it immediately or run unhardened for the event. This meant I had to use the kiln. Some experimental jiggling of the analog temperature dials found a nice ~1650 deg F of oven temperature. I weaved some magnet wire in between the drum holes for handling since copper melts at higher temperatures than 1600. I placed the drum inside the oven and let it bake for ~2 hours. Then this:


Water bath instead of oil for safety reasons. I think I may have taken too long to transport the piece from the oven to the water. It had a nice oxidation layer that cracked off from expedited rusting.


However, we still observe evidence of hardening via auditory means. A smaller hammer tapped on the side of the hardened drum produced a higher pitch ring than the unhardened one. This is indicative of a tighter packed atomic structure, or a harder material in this case.

The other parts came together as easy as cake. I turned by best piece yet and was able to keep a 1 thou tolerance on all dimensions. The magnet can was simply pressed down inside the can. Lets hope I never need to remove that piece...


... but I did.


This point shows the robot completed and playing with some objects and Michael Jeffries' 30lber Nyx, but little did I know it was nearly a half pound overweight. I took it to the post office to weigh it the week before the event and yeah.

Massive disassembly time and uber machining mode. Each system and component was weighed to determine how much I would need to remove to make weight. Things like motors and electronics could not be changed and were simply held as a minimum weight sum. The drum weighed a whopping 26 oz with motor and all. Because steel was the densest material on the bot, it would receive the machining operation first.

The can was lightened as much as possible by turning away massive aluminum voids. The drum's teeth were castled down to the drum wall. There were some sections of the teeth that had me worried about the penetration of the welds, but this would not be the time to worry about them.

The wheels received a significant amount of attention as well. The wheels, belts, and pulleys weighed about 3.5 oz which is still a butt-ton for the beetleweights. Instead of using bronze sleeve bushings and aluminum hubs, I opted for a single piece Delrin hub. It was light, easily machined, and had semi-lubercative properties which meant I could save on bushing weight. The wheel rubber themselves were recut with some lightening holes along the radius.


Hey check it out! Tweels! I was skeptical about their impact resistance and damping effects on the robot's drive, but it worked well for the time being. Final weight for wheels, belts, and pulleys now sat at ~1.3 oz.

After replacing the metal top and bottom plates with 1/32" polycarb and garolite (so sad!) the robot tips the scale at 48.1 oz. Both mid-plate supports were removed to make weight.

The final shots.


Some nice vinyl logos and a Invention Studio temporary tattoo prepares the bot for screen time. Lets hope vinyl doesn't weigh much. I also prepared some plastic shims as anti-wedge devices. Instead of using the easily-damaged nylon, I opted for .022" thick UHMW. It seemed flexible, but hopefully not too deformable.

July 14th: Competition Day


Michael Jeffries of Near Chaos Robotics was nice enough to drive me up to North Carolina. Clash of the Bots was held at the Scheleiele Museum. A nice indoor, ventilated venue with plenty of space and power was provided. Team pit tables were predetermined and a specific table near the back door was dedicated towards charging lipoly batteries. It was very well organized. I was fortunate enough to be stationed near the arena.


As usual, I didn't take many pictures, but other people did.

Match 1: Ramvac

Without much driving practice going into this match, I was a bit nervous. I've seen this robot time and time before and Sam is without a doubt a good driver. Ramvac itself was a very sturdy wedge. It used 4 of the same modified drive motors I had so it was fast and powerful. It features a UHMW frame with hardened steel on the important parts. I knew I would not be able to go for the knockout, but I would have to use gyro dodges to my advantage to out drive him and score points.


I learned from this match that I should never never never get flipped over at all possible. The weight distribution of the robot made it very front heavy, and inverted driving was abysmal. I think I am fortunate Ramvac decided to revert my robot.

Match 2: Weta

Pete has been competing robots for quite awhile, so I expected a well polished machine. This particular robot is actually available as a kit from his website Kitbots. Conclusion: this must be a good machine. I'm not sure about the particulars on Weta anymore, since Pete mentions he was experimenting with new drive motors and a faster motor. I decide this would be an opportune time to test the max speed of my drum as well.


Let's not do that again. It appears his beater bar is in fact faster and caused me to get flipped. I spend over half the match on my head but am luckily reverted to make an astounding comback in the last 30 or so seconds. If Weta was using his old drive system, I might have been in trouble.


He dented my Ti armor :(

Inverted driving is a capital item to be addressed before Dragon Con! At least we see how effective the angled plating is in deflecting blows.

Intermission: Robot Panic

When I placed Dom into the box to face Shame Spiral, I noticed that only one drive side was responsive. The other ESC emitting the "no signal" or "out of center" error. I am forced to use my postponement to discover the error. All wires a nice and glued in (what a pain) with no connections lose. I decide to remove DDT's receiver and run the bot off two receivers, assuming the ch2 on my Spektrum Ultralite had failed. However, I eventually discovered my ch 2 on my repaired dx6i had died. Julie from Near Chaos Robotics lent me her tx for the remainder of the competition. Thanks Julie!

Match 3: Shame Spiral

A tough wedge of shock-mounted UHMW and hardened steel outer surfaces (actually harder than my expected drum hardness). I had fought Shame Spiral before at Dragon Con and was easily defeated by Thomas' driving skill and well designed deflective wedge. I hoped this time that my increased speed and anti-wedge devices would allow one good hit to invert him, where I would then leave him for the remainder of the match. I received none such luck.


Despite hits to his sides, none were able to grab and toss. As a result, I was never able to get him off the ground. Through all the abuse, my power plug (a deans micro) falls out and I tap.

Match 4: Ramvac

I was more confident this time, knowing that I had won a match against him before. However the Tx business set back the beetle brackets pretty far and I had minimal time to charge. I would have to take it easy this time and line up good shots on his sides or back.


Match 5: Grande Tambor

The expedited beetle bracket takes it toll. I had only 10 mins to charge this time, but I decided some match was better than none. This would be the ultimate test of my armor as Grande is a hard hitter and I expected a few outages during the match from undervoltage.


Every time Dom pauses is a drive esc reset. There wasn't really much I could do except wait to reconnect. I confess I believe it is a terrible way to be eliminated, but the angled armor held up well and given all issues are resolved Dom will be back for a rematch!

Well, after I fix this:


Post-competition analysis:

Clash of the Bots 3 was a tough competition with a lot of great robots. Dominant mode went 3-2, which is actually the worst record I have ever had for a new robot. No longer can I depend on the knockout win, I actually have to start buying spare batteries. I also need to investigate the control losses during the match. Its possible the battery is the issue, as in the current draw from my motors, but it could also be a need for more bus capacitance. I will have to revisit my electronics to determine the cause of these mysterious power outages.

Conclusion, Dominant Mode is a keeper! It would be nice if I could reallocate more weight to the rear of the robot such that inverted driving was more effective. I also need to make sure the pinions never disconnect from the KW motors. I will be contemplating fixes for the drum's bearing setup, but I think that hit from Grande was an exception, since I was not spinning. I will however be buying more batteries in reflection of the short charge times.

Thanks to Robert of Mad Overlord, we also have high-speed camera footage to download for a limited time only!

I also want to thanks Mike Gellatly of Busted Nuts Robotics for helping to machine some semi-complex aluminum angle blocks for Dom's side armor.

Monday, January 10, 2011

Hot n Cold

By now I will be back at Tech. By now I should be starting to go to class. Instead I've been holed up in my residence because GT has shut down due to a flurry of snowfall last evening. It is pretty cold outside, but alas there is work to do: Cake's drive escs are getting too hot!

Seth at the Robot Marketplace recently informed me of a new set of KW motors for the B-series gearmotors. These guys pull more current, but are spec'd at 937 rpms at 12V or so. That is ~300 rpms over the old motors which will work great for my 1.5" drive wheels.

But if you ask me, it still feels slow compared to DDT. So lets take the motor mods a step further.

Tower Hobbies sells paired motors for direct drive foamies. 180 sized, high rpm, high current, and the correct shaft diameter. More importantly, they were on sale for a bulk buy!

The operation was a simple motor switch since the mounting patterns were the same.


Here the motors are installed with the B16 gearboxes. Ignore the new escs for the time being.
Months ago, I also purchased two scorpion mini escs to replace the damaged scorpion HX dual esc. You may recall, I had some SMT components fall off the board and while it has served me well my distrust is well placed. The two scorpion minis side by side fit perfectly horizontal in the electronics bay and open up much more room for the wires and plugs from the drum.


I applied a light application of glue on the edges to hold the two boards together, so that I could use breadboard jumper wires to bridge the main esc terminals like P0W3R busses.


Note how there are two plugs on the esc. One plug is actually for battery, but the other connects the the drum esc. Having the same connect with the same polarity makes for stupid proofing.

The real problem was that the new motors drew more current than the escs could handle. Evaluating my options, I felt that adding heatsinks was a far easier solution than disabling current limiting or upgrading the FETs. I cut some blocks of 1/8" thick copper bar (back when copper was not ass expensive) and tapped some 4-40 threads to facilitate mounting to the FETs.


A light application of silicon based heatsinking compound helps heat transfer between the materials. I also made a note to sand and polish the mating surfaces. Oxidation on the bar left lots of non-conduction crud on the outside.


Finally mounted we discover the robot to be significantly quicker, with extended runtime. I can achieve approximate 3 minutes of vigorous driving before the escs overtemp. This is acceptable.

Here is everything installed in the robot. The first picture of this post shows an unexpected benefit of adding the heatsinks. The board material fits right in between the header pins and the capacitor in my AR6110 receiver for optimal space savings!


Tuesday, November 30, 2010

And So it Begins...

http://www.buildersdb.com/eventdetail.asp?eventid=326

THAT DESERVES ITS OWN POST. TIME TO START BUILDING!!!

The fleet that probably will be going:
- P150 (defending champion 2008), 150g
- DDT (really damn entertaining), 1 lb
- Cake, 3 lbs
- Var Machine (because War Machine is a taken name), 12 lbs

Now there is a bunch of work to be done. For instance, P150 needs to be built, Cake's new drum needs to be hardened and assembled. Var Machine is still a vapor bot :/

Fortunately my good pal Richard over at MLEC might help with some machining if I drive some of his robots. Stay tuned for more!

Tuesday, September 7, 2010

Messing With Animations

Oh yeah, ispwn() = 1;


Hopefully Georgia Tech's Mechanical Engineering Department agrees.

Friday, September 3, 2010

Gulf Coast Robot Sports (6)

Its been about three weeks since GCRS took place. I went back to sunny Florida and made the trek by myself (in my new car!) to Bradenton to visit the Robot Marketplace Retail store for a competition they like to host every 2-3 months.

I attended with my two main robots, DDT and Cake. In short, DDT was pretty abysmal and Cake went to win the beetles 4 wins, 0 losses.

Here are some matches.


Cake came away with the most damage it has ever accumulated (which is not very much). A lot of the hits were to the the soft steel drum, which is expected since that is the business end. I didn't expect anyone to divot it, but Voodoo Magic is a pretty mean bot. All other surfaces fared very well, offering only glancing blows for the opponent. Never was I tossed backwards by a frame hit.


DDT on the other hand, is not a fan of this arena. The low walls were to blame for all of the losses. I remember DDT doing really well in the past, and I believe it is because of the fully enclosed arena. Gosh, I really need one of those back. I will probably run DDT for the remainder of the school year and then build another ant. He has served well, but there is much to be discovered in the robot world.

Dragon Con is this weekend. DDT will have the chance to redeem himself. Unfortunately it will be difficult because the Robot battles arena also have pushouts :/

Sunday, August 8, 2010

Christmas in August

I finally returned home to a room filled with all the random machined parts that I ordered while I was away. Woohoo! It was a tiring ~15 hour drive, but suddenly I felt energized. Check 'em out!


Random plate for the Iron Man cosplay


Laser cut PTEG for the arc reactor diffuser


Some of these parts, look assembled. Apologies, I just couldn't keep my hands off them. :P


I was satisfied to find that T-Nut assembly is very effective. The friction clamp between the parts is more than enough to hold the pieces together. What is marginally irritating is the slight taper on the waterjet parts. This means two parallel parts attached on end might have end play of some +- .001 which is enough to make tight parts difficult. I may true the ends on a bent sander if it becomes a major issue.


Getting back to my drill press allowed me to see how the truck parts fit together. upon inspection, everything seemed to fit well. That is a thrust bearing on a bronze bushing. The bushing was a tad too long, so I will have to add washers to the thrust bearing so it can have adequate contact to the mounting block.


Look at the pretty arc reactors! I still need to prep them for diffusing light. I will probably lightly scuff the fronts of the PETG parts to give it that haze. Although 6mm is pretty thin, I am hoping it will be enough. Worst case, I'll use paper or some wide angle LEDs.


Tomorrow I am hoping to hit the local-ish surplus store for some random odds and ends needed to finish the projects. First and Foremost, I need to buy some 1" square aluminum stock for the truck pivot blocks. I neglected to order those parts in hopes of finding what I would need. If this works out alright, then I don't need to order from McMaster.