Saturday, December 11, 2010

I Added a Scooter to my Motor

Here's the story:

On Black Friday, I bought this Razor-A scooter for $17. Now why would I waste my money on a scooter built for 5 year-olds(+)?

So I could concatenate one of these with it:

That is a 24v, 400W Kollmorgen brushless sensored motor that weighs 5-6 lbs. It is made for electric bicycles and weighs more than the scooter frame. Finally, it is larger in diameter (~5") than the scooter wheels (98mm ~ 4").

Needless to say, this is a project of epic disproportions! Yet, I still want to be manageable so I can actually use it in my cross campus commutes. Here's the game plan:

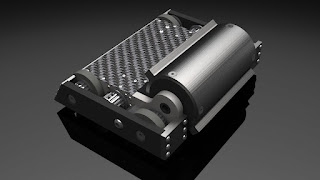
I am going to make an extended under body to house the batteries and extend the length so I can have some foot space and motor mounting provisions. Tentative model:


The wheel will be chain driven (#25) at about a 2:1 ratio. The frame thickness about the body is 1.25". The spoiler on the back is not for down force but rather acts as a foot rest because the frame is so small (seriously, the frame can only fit one of my feet lengthwise). Everything has slots, T-nuts, and delicious waterjetting. This will require major frame modifications too. The rectangular extruded frame will need to be cut on the bottom to allow the battery to hide inside. Also, some of the flanges on the side will need to be cut off because I need a flat surface to bolt the aluminum plates. Each operation removes from the structural rigidity of the frame which worries me.

Now one decision I am regretting is making the front segment from 1/4" polycarbonate. Why on earth would I make such an important part from (thin) plastic? Well because I already had it on hand. I'm in college and money doesn't grow in trees. I am worried about it bending or snapping somewhere in that region. I would run FEA on the part, but I have no idea what grade of shit-luminum Razor uses on their scooter.


Lots of pretty parts. The front of the undercarriage is made already from pre-existing plates of polycarb. Longpack and Macromotor wait in the wings...


And here is the integrand. One razor scooter awaiting cosmetic surgery...

Anyway, A lot of building happened in the span of three days and magically the project is done! My phone actually ran out of batteries so I couldn't take any build pictures. :(

Sorry folks, all you get are end result pics and video!


Sitting pretty by my fridge(s).


The throttle is a 5k pot with a shaft hub from Servo City. I should enclose those wires sometime soon.


The rear module. You can tell it is slightly different from the original CAD because I had forgotten which direction the motor spun. This made for a very disappointing initial ride test.


Closeup of the slot and tab T-Nut design. I experimented with the tool offsets on the waterjet such that it is a perfect slide with higher quality cuts. Are you proud of me Charles?


The underside. Notice where the metal becomes polycarb. I expect this region to be first to fail because it sits in between the two wheels and theoretically supports the entire rider's weight.

It has more than enough power to flip a rider over and reaches a top speed of ~20mph (calculated as 3500rpm on a 98mm wheel). It is amazingly unsafe...

... so I shall call it, "Safety Razor"

Tuesday, November 30, 2010

And So it Begins...

http://www.buildersdb.com/eventdetail.asp?eventid=326

THAT DESERVES ITS OWN POST. TIME TO START BUILDING!!!

The fleet that probably will be going:
- P150 (defending champion 2008), 150g
- DDT (really damn entertaining), 1 lb
- Cake, 3 lbs
- Var Machine (because War Machine is a taken name), 12 lbs

Now there is a bunch of work to be done. For instance, P150 needs to be built, Cake's new drum needs to be hardened and assembled. Var Machine is still a vapor bot :/

Fortunately my good pal Richard over at MLEC might help with some machining if I drive some of his robots. Stay tuned for more!

Monday, November 15, 2010

Hardboard: Death Metal \m/

So it turns out the springs won't cut it. I decided to haul the board with me one rainy day and ride it between classes. Pretty poor idea. First of all, the wide tire surface and the slickness of running water caused the board to hydroplane down some fairly steep slopes. The worst part was knowing it would happen. As I coasted down the hills of Georgia Tech, the board would oscillate violently. Turns out the springs were too soft and too responsive so a small semblance of a turn would soon be amplified to full extensions in a short period of time. I bailed off several times.

I put the board away for a few weeks and tacked other important things in the mean time. The finished Longpack for example.


I am a big fan of the blue shrink wrap. What I thought was really cool was how I could actually use the range on top of my stove to heat an area. It made me feel much safer than running a lithium battery under a flame.


The boards are in! Xo placed the order with Advanced Circuits and we received them as a strip of boards. I took a few of them with me to the Invention Studio one morning and cut them to size with the dremel tool.


The slot was also made through the ground plane to facilitate the edge of the nunchuk.


I also added some hall effect sensors to the hub motors. Three per hub motor, 120 degree spacing, attached to the tooth.


I'm not adventurous enough to try the flipped tooth method that Charles uses, although it would be much more convenient as I found out in the process.

Enough of that. THIS BOARD NEEDS TO HAPPEN NOW! I grabbed the deck and started prototyping resistive methods.

This plastic clip made from UHMW proved to be promising. The issue is that the truck angle is about 45 degrees, which means there is a 1 to 1 ratio between the person's movement and the trucks movement. With a person placing their weight on the edge of the deck, this means the resistive plug needs to exert 200-300 pounds of force without breaking or permanently deforming. Not an easy task.

Fortunately, these little guys did the trick.


These are also made from UHMW, but are taller and have additional bolt holes for more support. The older versions (also in the picture) have only two bolt holes, which twisted and widened after continual use.


What's left? Well next up is to solder the components to the boards. This should happen on Monday. My goal is to have this riding on Tuesday. How sweet would that be if I took the motor board to my meeting with Dr. Forest? =D

Saturday, November 6, 2010

Irony Man

Instead of typing up the entire build report, I have this comprehensive Instructable instead. I may edit it or add addtional anecdotes for the technical audience, but at this very moment, I am both tired and hungry and I unfortunately cannot satisfy both at the same time.

Here are some of the Iron Man / Tony Stark costume pictures separated by a link:


http://www.instructables.com/id/You-as-Tony-Stark-as-Iron-Man-A-Costume/


Cheers.

Wednesday, October 20, 2010

Like Product like Model


Pretty awesome eh? I might try for an exploded animation like I had done for Cake a few posts back.

In the meantime, Xo has gotten some pretty impressive electronics work done for the wireless system. I could try my hand at explaining it, but he does a much better job than I could ever do. A trial run video will be up soon.

\m/etal power.

Sunday, October 17, 2010

Moar Bord

So by popular demand, the project is renamed "HÄRDBÖRD". I second this change because I did not much like calling it Fluffy, being not fluffy but still incredibly adorable. All previous references to Fluffy former will be updated to HÄRDBÖRD. I need a better way to inserting Umlauts into text...

Onto the interesting
stuff:
___________________________________________
____________________

Had another massive build session last night at the Inv
ention Studio. This one pretty much wrapped up the mechanical aspects of the board. Safe to say, it is drivable by method of kick.

Last build session I had the board almost drivable e
xcept for the turnigymotors which were plain can. Yeah, not going to rough up that beautiful Chinese machining for some unenjoyable joyriding. So first operation of the evening was coring out some wheels.


Here is the invention studio baby-lathe in the back corner of the o
ther room. A bunch of really cool automated machines sit here, but only 4 of them belong to us (CNC not included). Still this lathe is pretty sweet, because it can do the whole threading trick. Other than the standard lathe functions (gear ratios, digital readout, etc.) it has an auto jog. Woot.

Mounting the wheel to the chuck was an interesting task because the jaws were not exactly large enough to handle the object. I had to resort to the inner set of teeth
and crank really hard into the soft 30A durometer wheel tread... Sounds like a terrible idea.


But it came out pretty awesome. Wheel, cored ring-o-wheel, motor can, and motor core all in one picture. A perfect slide-press fit too (with the exception of the screw he
ads)!


Partway through, I realized we would have to push an extra .25" deep so we could access the screw heads on the near side bearing of the motor. For this, we employed a rando
m piece of scrap. And Arrrrrrborrrrrrrrr presssssss.

Bam, wheelmotor...and then there were two.


Two motors one truck?

Then reassembl'd.


While Xo assembled his stuff, I made a few laps around the MRDC on the board. Verdict: it works but with corrections that need to be addressed.

The springs are too soft. While the truck turning geometry is fin
e, the springs used to give resistance to the turns are too soft which makes the board very... "responsive". It is far too easy to over turn and drive some retarded sinusoidal board path. This probably means some design correction is in store. When I say probably, I mean definitely.

A very important but final modification to this build session was the shortening of the power pack. The stock 4Ah, 6s1p lithium batteries I purchased were 39mm tall (~1.5" +4mm) which is taller than I would have liked it. The goals for this now are to fit everything underneath the 1" square 8020 piece, which might be just impossible depending on how tall the out pins on the Maxons are. Eitherway, introducing longpack.


..and oh yes, it is very long. (163 x 2)mm long, which is over 1 foot of POWER.

IT IS A 4 AMP FOOTLONG!!!


Monday, October 11, 2010

While You Were Away

Tons of stuff has happened that I will need to update later on. But for whatever reason using Blogspot makes me really lazy when I put up pictures. Anyway, notable events that need to be updated are:
  • completion of the Tony Stark /Iron Man costume
  • Dragon Con 2010
  • HÄRDBÖRD build report
I'm going to neglect the first two in favor of HÄRDBÖRD, because at this moment I am very proud of the current achievements. Commence build report.
__________________________________________________________

We left off at the fabrication of the board (including misc parts) and the installation of T-nuts. It was essentially a frame. As it stands right now, it is still a frame, but fanciful one with moving parts!

This semester I became a ULI for senior design (somehow) which gave me access to the fancy jumbo tools that the institution has. First and foremost is the Omax Waterjet cutter, which I have grown a close relationship too over a few long nights and days.

On Friday I began making some real parts (as opposed to other days where I would dick around with the scraps). First on the block were those 3/8" Al mounting pieces to hold the pivoting truck bars. This was a slight improv over the original design which included plastic parts. I dumped the plastic for the metal because the mill did not yet have tooling, so it would have been awhile before I could actually get to making them, and I wanted a test drive. So in my haste, I waterjet some 1" x 1" squares from a piece of scrap and end tapped them to replace the plastic parts.

Here they are installed:

that took about "x" amount of hours and by then it was probably midnight. But it was also Friday, where frankly I don't care how late I stay up because there are no classes on Saturday (just service projects and football games).

I decided to improv once again and ditch the plastic design on the pelvic bars for \m/etal t-nut designs.

It was named "pelvic thrust" in haste (is this what 4am Jolt engineering feels like?).

I was fortunate to find another scrap sheet of mystery 1/4" Aluminum to test the idea. On the waterjet it goes. Dry runs should go quicker, seriously. I didn't like watching the head move around for 17 minutes to watch for errors.

Here's a video of the cutting action:


It looks unexciting because the parts must be submerged in water while being cut and the garnet clouds the water so you can't see into it. Still there is a quaint little monitor that you can track the machining head with.

The result:


Pretty sweet eh? too bad it is messed up. Can you spot the error?

During the final minutes of the cut, a jet of water circulating through the cutting bed pushed one of the random cutouts from the piece and it hit the jetting head shifting something over. It caused the cuts to be slightly off center so the entire bottom row of parts (which ironically are the important ones) were unusable. Observe the rightmost t-nut slot for the obvious error.

I still had enough parts to assemble one leg and that is exactly what I did.

Here stands a leg fully assembled. I found out later (by empirical testing i.e. hitting it) that the mystery Al was actually 7075. THIS IS NOT SCRAP!!! Good for me :)

I finished my classes and rand back to install the motors.

I was surprised to find that the bolt holes were perfectly placed with no rubbings of any sort. With such positive feedback, I proceeded to mount it to the board.


The plastic sheets allow the board to shuffle left and right without resistance by the carpet. Story short, it works! The steering mechanism works! My roommates and I all took turns trying to see who could balance themselves the longest, which proved to be extremely difficult because there were no springs installed to give leaning resistance.

You may also assume the wheels are not mounted yet. You can actually see a wheel randomly in the floor to the north of the board. Those are 4" dia, 2" wide, durometer 30A wheels from McFaster-Carr. They came in at a pricey $14 each but should give good shock absorption, traction, and small dia (for torque).

Other Related Updates:

I just realized that I did not address the parts purchased for the project. The wheelmotors are built from some nicely sized Turnigy outrunners. They are about twice the size of Attrition's drum motor by length. The idea here is to produce the maximum amount of torque because I have a feeling we will fall short in that category. The motors may require a rewind because they are not only 280kv motors (which translates into about 35 mph no load) but they will probably draw too mugh current for the poor little Maxon DEC 50/5 modules that we plan on using to drive them.

Speaking for Maxons, Charles Guan has written up a very nice report on the use (and abuse) of these modules for brushless EV use.

Power comes from these 6s1p 4000mah Turnigy batteries. I was excited to find they they came with adapter plugs that matched the format of the Thunder Power plugs so I could actually balance these guys.

Wireless controls come from a Wii nunchuck and a pair of Xbee modules. I would elaborate more on the operation, but mush of that has been the duty of my experienced counterpart in the project, Xo Wang. All I know for certain is that it has a 5v analog output (necessary to drive the Maxons) and uses the nunchuck features to produce some damn awesome control (button enables for drive, with proportional control from the joysitck).

Also notable, I modified the design of the supports for the board. In my rush to putout the order earlier this year, I poorly designed the supporting frame members through the board. Although the center was rigid and safe, it did not extend to the trucks, which essentially left a high moment on some parts of the frame not designed to handle moments (evaluation done by my visual FEA). So here is the solution:


Replace all that metal with a single length of 8020 Extruded aluminum. Lighter and smaller in profile, with more mounting solutions. I found it a win/win situation except now there is a giant metal beam running though the center. Makes it harder to completely distribute the weight of parts but the radius from the center of rotation is so small it shouldn't matter much at all.

Left to Do:
  • Order Maxon DEC 50/5 modules.
  • Finish component storage bays
  • Finish second set of steering trucks
  • Wire, and mount
  • Lrn 2 longboard.

Tuesday, September 7, 2010

Messing With Animations

Oh yeah, ispwn() = 1;


Hopefully Georgia Tech's Mechanical Engineering Department agrees.

Friday, September 3, 2010

Gulf Coast Robot Sports (6)

Its been about three weeks since GCRS took place. I went back to sunny Florida and made the trek by myself (in my new car!) to Bradenton to visit the Robot Marketplace Retail store for a competition they like to host every 2-3 months.

I attended with my two main robots, DDT and Cake. In short, DDT was pretty abysmal and Cake went to win the beetles 4 wins, 0 losses.

Here are some matches.


Cake came away with the most damage it has ever accumulated (which is not very much). A lot of the hits were to the the soft steel drum, which is expected since that is the business end. I didn't expect anyone to divot it, but Voodoo Magic is a pretty mean bot. All other surfaces fared very well, offering only glancing blows for the opponent. Never was I tossed backwards by a frame hit.


DDT on the other hand, is not a fan of this arena. The low walls were to blame for all of the losses. I remember DDT doing really well in the past, and I believe it is because of the fully enclosed arena. Gosh, I really need one of those back. I will probably run DDT for the remainder of the school year and then build another ant. He has served well, but there is much to be discovered in the robot world.

Dragon Con is this weekend. DDT will have the chance to redeem himself. Unfortunately it will be difficult because the Robot battles arena also have pushouts :/

Sunday, August 8, 2010

Christmas in August

I finally returned home to a room filled with all the random machined parts that I ordered while I was away. Woohoo! It was a tiring ~15 hour drive, but suddenly I felt energized. Check 'em out!


Random plate for the Iron Man cosplay


Laser cut PTEG for the arc reactor diffuser


Some of these parts, look assembled. Apologies, I just couldn't keep my hands off them. :P


I was satisfied to find that T-Nut assembly is very effective. The friction clamp between the parts is more than enough to hold the pieces together. What is marginally irritating is the slight taper on the waterjet parts. This means two parallel parts attached on end might have end play of some +- .001 which is enough to make tight parts difficult. I may true the ends on a bent sander if it becomes a major issue.


Getting back to my drill press allowed me to see how the truck parts fit together. upon inspection, everything seemed to fit well. That is a thrust bearing on a bronze bushing. The bushing was a tad too long, so I will have to add washers to the thrust bearing so it can have adequate contact to the mounting block.


Look at the pretty arc reactors! I still need to prep them for diffusing light. I will probably lightly scuff the fronts of the PETG parts to give it that haze. Although 6mm is pretty thin, I am hoping it will be enough. Worst case, I'll use paper or some wide angle LEDs.


Tomorrow I am hoping to hit the local-ish surplus store for some random odds and ends needed to finish the projects. First and Foremost, I need to buy some 1" square aluminum stock for the truck pivot blocks. I neglected to order those parts in hopes of finding what I would need. If this works out alright, then I don't need to order from McMaster.

Tuesday, July 27, 2010

If War Machine Was a Combat Robot...

... he would look like this.

I am proud to announce the final screws have been added. "Tofu" design is now complete and I can theoretically begin manufacturing.


Cheers!

Sunday, July 25, 2010

Pretty Pictures

Some models I designed and rendered for a friend of mine.


Not so bad for a freehand drawing. I didn't have anything to go off of except this picture.

Friday, July 23, 2010

Since we have Baked the Cake...

... ferment the Tofu?
I though it a decent introduction initially but now it seems silly. Why the heck did I name this guy Tofu. I was originally going to name it "War Machine" because of the dull grey metal colors matching that of the Iron Man counterpart. But I named it Tofu as a standing name, and now the admins on the RFL won't change it. Bah. Regardless, Tofu will represent the pinnacle of my ability at this point in my career.
Tofu:
  • 12-pound combat robot
  • hardened tool steel outer armor / 2024 inner frame
  • slotted frame pieces
  • single-piece stagger-tooth drum
  • custom integrated brushless motor technology
  • pioneered "stuffed drum" technique
  • re-engineered drive gearboxes with hot wind motor swap (maybe neo magnets)
No doubt it will be a pricey project, but this hobby is hardly cheap. Instead of cutting corners or bargaining desired features in parts like on "Attrition", I want to put in every design feature into this robot. More proof of concept than "combat competence". I basically want to make sure that my designs perform completely as intended, and leave no feature (or lack thereof) to chance. Think of it as a 8" square experience resume.

Anyway, onto the good part. Here is a render and some good pictures:


Tofu will use a few of Attrition's old parts. The BB 12-45 escs are still good. The stator and magnet can from the previous brushless drum is also still in good shape but I would like to reduce the number of turns for a higher RPM drum. The Team Whyachi MS-05 power switch is also in pristine condition but that is expected from a simple (and expensive) device. All in all, that saves about $150, so I can't complain. You are rewarded for taking care of your electronics (isn't that ironic how I am putting them through intentional abuse?).


The 32mm Transmotec gearboxes are also still good although their motor mounting plates are starting to strip out so I will have to remake them.


While I remake them I will also make them better! Here I replace the circular mount with a square one consistent with the thickness of the body of the robot. Although being larger, the square interface acts as an additional support for the motor, so the whole thing won't shake so damn much, which was a HUGE problem with Attrition. Rear motor clamps will also be added for rigidity.

The next real competition for Hobbyweight class robots will be in Feburary at Motorama in PA. Time to get started.

Note: These pictures are pretty old. I developed the designs in the Spring and have been updated since. I'll make an updated post soon enough.